Netgear WN2500RP Setup
The Netgear WN2500RP Setup acts as a bridge between the main access point and the accessing devices. It takes in the current router signal and amplifies it to reach network locations in the house that are difficult to access. After the extender is configured, it is put in a spot where WiFi dead zones occur. Usually, larger residences or multi-story buildings experience this. The extender signal can then be accessed by the devices in those locations. For these devices, the extender functions as an access point. This article contains all the information you require right now if you’re looking for instructions on how to set up a Netgear WN2500RP. We have compiled all of the information required to set up the extender right here.
How to Do Netgear WN2500RP Setup?
You have three options for configuring the Netgear WiFi range extender: the web interface, the Nighthawk app, or WPS. Every way to finish the setup procedure is covered in advance.
Note: If you need any assistance regarding your Netgear wifi extender, get in touch with us via the chat button you see on the bottom right corner of this page.
Netgear WN2500RP Setup via Web GUI
To reach the Netgear Genie page using this setup technique, use a web browser and the login web address mywifiext.net. This explains why the extender setup procedure is referred to as the manual technique. The steps involved are as follows:
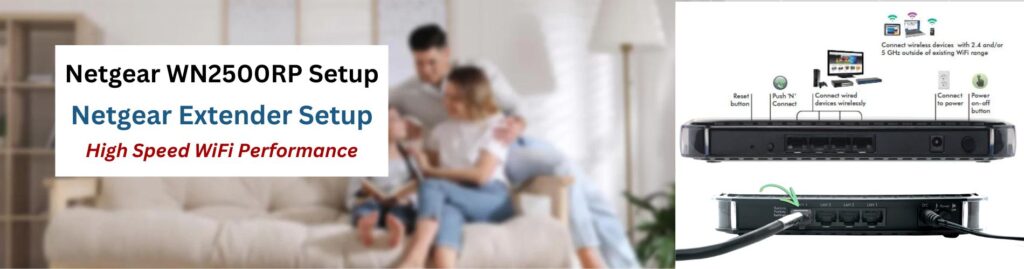
- Turn on the power after inserting the extended power adapter into a functional, undamaged wall socket. The flickering of the LEDs will be noticeable. They ought to calm down soon. When they reach a steady state, the gadget has successfully powered up. At this point, you can start the setup procedure.
- Take an Ethernet cable that is either new or undamaged, and place one end into the router and the other end into the range extender.
- Take out a computer and launch your preferred web browser.
- To access the login page, go to mywifiext.net.
- Proceed to access the Netgear account by entering the default login details.
- You’ll be presented with the Netgear Genie intelligent setup wizard.
- After following the directions displayed on the screen, the setup can be finished in a few minutes.
And that’s it! The Netgear WN2500RP configuration is now complete. Utilizing the network name Netgear_ext, you can start utilizing it to access its network.
Netgear WN2500RP Setup via WPS Method
The router needs to be WPS enabled in order to proceed with this method. To use this strategy, the router has to have a WPS button. It’s as simple as counting from 1 to 10 to set this up. Therefore, using the current WiFi network to configure their devices is the method that Netgear consumers choose to utilize the most. The steps are as follows:
- Turn on the WiFi range extender’s power supply by using a power adapter. Proceed once the lights have stabilized.
- Pay close attention to the WPS button on it.
- Press it.
- In a similar manner, press the host router’s WPS button.
And voilà! Everything is ready to go. Now that your extender is linked to your home network, you can use a variety of wireless devices to access its WiFi by using the network name Netgear_ext.
Netgear WN2500RP Setup via Nighthawk App
It is required that you have this app loaded on your smartphone if you use Netgear. Go to the Play Store or the App Store and download it if you haven’t already. You can effortlessly manage your Netgear equipment with this very software. All you have to do is log in with your Netgear extender on the app to alter the SSID, password, and other settings. You can also add guest networks, enable parental controls, and do other operations. The Nighthawk app can also be used to complete the initial setup. The following are the procedures to set up the Nighthawk app:
- After downloading and installing the Nighthawk app, tap its icon to start using it.
- Follow suit when requested to input the standard login information. Verify that the admin username and password are entered in the appropriate sections.
- To proceed, click the Log In button.
- You are welcome to use the Netgear Genie smart setup wizard.
- To finish the setup, you must reply to the following on-screen instructions.
Best wishes! You’ve successfully finished using the Nighthawk app to set up your Netgear WN2500RP. Enjoy uninterrupted internet connectivity by moving the extender to the location where you require the WiFi expansion. If you run into any problems, installing your wireless device, you should think about getting in touch with our professionals.
Netgear WN2500RP WiFi Range Extender Login Steps
- Connect your PC, tablet, or smartphone to the extender’s internet connection.
- On the mobile device, open an internet browser.
- Input mywifiext.net login into the address bar of the browser.
- Input the standard login credentials, which are often “admin” and “password.”
- To see the extender setup page, click “Login.”
- To configure your network preferences, simply follow the on-screen directions.
- To utilize your extended WiFi, save your configurations and unplug from the extender’s network.
Netgear WN2500RP firmware update
How to Reset Netgear WN2500RP Extender ?
- Join the extender’s WiFi network.
- Launch a web browser.
- Go to mywifiext setup.
- Use default credentials (admin/password).
- Go to the settings menu.
- Select the firmware update section.
- Click “Check for Updates.”
- If available, download the latest firmware.
- Follow prompts to install the update.
- Wait for the restart of the extender before making any adjustments.
- Find the reset button on the extender.
- Make sure the extender is plugged in.
- Click the reset key with a hairpin.
- Keep pressing for 10 seconds.
- Release the button once the LED blinks.
- Allow the extender to reboot.
- Reconnect to the extender’s default network.